About a month ago I read about a design team call for a company called Faithfully Yours. I've always thought it would be fun to be part of a design team, but really didn't have the time. Now I'm not so sure things have changed so much that I have a lot of time on my hands, but whatever the reason, I decided to throw my name in the hat. Well, a couple of weeks ago I got the email from Dawn notifying me that I had been selected as a member of her design team!!!
How cool is that!!??!! It gets better because today I checked my mail to find my first shipment of supplies. Woohoo!! I was so excited I had to take a few pictures of the lovely paper and embellishments Dawn sent.
This here is the newly released Easter Collection and it's a beautiful line of soft pastels in both romantic and whimsical patterns. Dawn also included several sheets with a neutral background in different colors that will complement either style very nicely. What really caught my attention with this company's product is the quality of these papers. They are a very nice, thick and heavy cardstock. They are heavy enough to stand alone as a layout without using cardstock behind them for support.
I really like that Dawn offers collections to complement all of life's journeys and adventures with color palettes ranging from soft pastel colors to bold primaries. This collection pictured here is the Praise collection and include the bold primary colors you see here as well as deeply saturated fall colors.
Another fun item I received in my shipment today is something that is so useful in the scrapbooking world, but one I've never seen before. They are 12" strips paper in both 1" and 2" widths, perfect for those border punches. This is a product saver and a money saver!! No more wasting a full sheet of 12x12 paper just to punch out a border!! How cool is that?
I love all the wonderful product that Dawn offers, but what really appreciate about her company is that all her product is faith-based. Of all the scrapbooking I do, I think the most important thing to document for my kids and future generations is my faith. I may not get to meet my great-grand kids, but I can leave them a legacy of faith and hope through my scrapbooks. In fact, Dawn has termed a new phrase in the scrapbooking world to leave this very specific legacy of faith. She calls is Faithbooking! I encourage you to stop by her website and take a look at some great product and start your very own faithbook.
Wednesday, March 28, 2012
Tuesday, March 20, 2012
Big Thunder
BIG THUNDER!!!
Have you ever bought a piece of paper because you liked the pattern, but at the time had no idea what you were going to do with it? Well that's the story with the paper I used today in this LO. It's by My Mind's Eye and it comes from their Laundry Line collection. I must have bought this paper at least three years ago. Honestly it's been sitting around so long I'm not sure when I bought it. But whenever it was, I just knew it would come in handy some day. When I sat down to scrap these pictures, I immediately thought of this piece of paper as it has a nice old "frontier" feel to it. I cut the title to this LO with my Silhouette using a fun western font. After cutting the letters, I ran them through my Cuttlebug which gave them the diagonal texture you see. I finished the letters up by inking the edges. I think it captures the spirit of the old west beautifully. The cactus I've had for a while too, but gave it a little dimension using some Stickles in a cinnamon color. It matched the brown of the cactus very nicely and represents the ribs you would see in a real Saguaro. The sheriff badge, pistol, rope, boots and cow head are all stickers from EK Success.
I placed the title and embellishments on a sheet of Making Memories Noteworthy journaling paper. I thought this would provide a nice grounded space for the title.
The journaling here is the track they play when you board the ride. It says "Hang onto those hats and glasses because this here is the wildest ride in the wilderness." I decided to cut up some strips and arrange them to look like an old rickety rope ladder you might find in an old abandoned mine. I distressed the edges using an old steak knife then drew a border around the edges.
Thanks for looking and have a great day!!
Sunday, February 26, 2012
Attention!!!
I have another project to share today!! It's a layout of my son posing with one of the Army men at Disney's Hollywood Studios. As much as he loves anything related to the military, he didn't want his picture taken here. So what's a good mom to do...make him!! LOL So after much encouragement and cajoling, he finally gave in. He did pretty good too!!
I used the new This and That collection from Echo Park. The colors and designs of this collection are very versatile and work great for little boy layouts. I also used some older papers that I've had in my stash for a VERY long time. The camouflage paper is so old it doesn't have any print on the bottom or back to let you know who the manufacturer is. The brick patterned paper is some really old Daisy D's.
Most of the stars I used here were from Reminisce Real Magic collection. Very Disneyish!! I adhered them to black cardstock and cut them out to give them a little more definition.
The title here I chose a Mickey Font using my Silhouette. The little army men were cut using the Toy Story cartridge from Cricut.
This was a fun layout and came together rather quickly. Thanks for stopping by.
Tuesday, February 21, 2012
Volunteer Layouts
One of the sites I visit for inspiration is Disney Scrappers. It's a small group of people who enjoy scrapbooking their Disney vacations and discussing plans for future vacations. One of the ladies who belongs to this forum asked for some help in putting a scrapbook together for a friend of hers. This lady has two young twins who were both born with Spina Bifida. They were granted a trip to Walt Disney World through Make a Wish Foundation.
What this family must go through day after just breaks my heart. Every mother and father wants their children to be born healthy. So I was happy to volunteer my time and supplies to put something nice together for this family. Here are some of the pages I put together for them.
I just love these little princess dresses I made with my new Cricut. I hope they do too!!
Here's another LO I made using my Cricut. I think Cinderella and her shoe turned out really well.
I heard one of the daughters loves Daisy, so of course I had to make a Daisy LO for her. I hope she likes it.
What this family must go through day after just breaks my heart. Every mother and father wants their children to be born healthy. So I was happy to volunteer my time and supplies to put something nice together for this family. Here are some of the pages I put together for them.
I just love these little princess dresses I made with my new Cricut. I hope they do too!!
Here's another LO I made using my Cricut. I think Cinderella and her shoe turned out really well.
The title for this LO I made using my Silhouette. I made this LO especially for their Bibbidi Bobbidi Boutique makeover.
This LO was also made for the Bibbidi Bobbidi Boutique makeover as well, but for a different daughter.
Of course no trip to WDW would be complete without a visit to see Tinker Bell and friends, especially for a young girl. So I thought I'd make a Tink LO too.
Thanks for stopping by and I encourage you to do something nice for someone today. Even a small thing will make you feel so good!! Have a great day!!
Monday, December 19, 2011
Merry Christmas
"It's beginning to look a lot like Christmas, every where you go." Can you believe it's Christmas time again? I can't either. To kick off the Christmas season this year, my husband and I surprised the kids with a trip to Disneyland on Thanksgiving Day. After all, there's nothing like walking down Main Street (with 50,000 of your closest friends - LOL) listening to Christmas carols and seeing the castle all decorated with lights and ornaments to put you in the Christmas spirit. Right? Yeah, we thought so too!
So on Thanksgiving Day we had an early dinner and then left for what the kids thought was going to be a trip into town to see a movie and then dessert. When we arrived at the airport and announced we were going to Disneyland instead, they were so excited! Then it dawned on them they hadn't packed anything, so they thought we were going to have to drive all the way back home to pack. Nope! I had done all the packing and had hidden their suitcases in the back. We were ready to go!
We arrived at Disneyland that evening and caught part of the fireworks show. We even managed to ride a few rides and have some hot cocoa and dessert. If you haven't been to Disney during the holidays you really should. The decorations and lights are amazing. Here are a few of the decorations we saw around the park.


What would the holidays be at Disneyland without a holiday dessert? These little cuties were at almost every restaurant we visited. These are the Mickey Demitasse cups and they come filled with a delicious chocolate mousse and the cup is yours to keep. From what I hear these cups are available every year with a different design. How cool is that for the collector? They were also very yummy!
Of course what Disney trip for our family would be complete without a Photopass picture in front of the castle. Here is this year's picture for us.

I used Basic Grey's Eskimo Kisses paper collection. I thought the colors in this collection worked perfectly with the colors of the castle. I'm glad I still had some sitting around! I also used Martha Stewart's punch around the page to create the border around the white cardstock. Thanks for looking and have a very blessed Christmas and a prosperous New Year!
So on Thanksgiving Day we had an early dinner and then left for what the kids thought was going to be a trip into town to see a movie and then dessert. When we arrived at the airport and announced we were going to Disneyland instead, they were so excited! Then it dawned on them they hadn't packed anything, so they thought we were going to have to drive all the way back home to pack. Nope! I had done all the packing and had hidden their suitcases in the back. We were ready to go!
We arrived at Disneyland that evening and caught part of the fireworks show. We even managed to ride a few rides and have some hot cocoa and dessert. If you haven't been to Disney during the holidays you really should. The decorations and lights are amazing. Here are a few of the decorations we saw around the park.


What would the holidays be at Disneyland without a holiday dessert? These little cuties were at almost every restaurant we visited. These are the Mickey Demitasse cups and they come filled with a delicious chocolate mousse and the cup is yours to keep. From what I hear these cups are available every year with a different design. How cool is that for the collector? They were also very yummy!
Of course what Disney trip for our family would be complete without a Photopass picture in front of the castle. Here is this year's picture for us.

I used Basic Grey's Eskimo Kisses paper collection. I thought the colors in this collection worked perfectly with the colors of the castle. I'm glad I still had some sitting around! I also used Martha Stewart's punch around the page to create the border around the white cardstock. Thanks for looking and have a very blessed Christmas and a prosperous New Year!
Monday, November 7, 2011
Welcome to the 100 Acre Wood
I'd like to share with you all our family's most recent party. Every once in a while my husband and I like to surprise the kids with a theme party. Well, on Friday afternoon/evening we visited the 100 Acre Wood right in our own house.
After dropping the kids off at school Friday morning, I hurried home to begin the transformation. The first thing to do was remove the furniture from the living room. After this was done we could begin transforming the living room into the 100 Acre Wood. I assembled three "trees" from 8" cardboard cement tubes I got from Home Depot. I simply stacked one on top of the other and taped it really well with packing tape. Then I wrapped each tube with brown, plastic table cloth sheathing from the party store. For the tree tops I cut a slit into the center of a round, plastic table cloth and slid these over the tubes. I secured these to the ceiling with push pins.
After the "trees" were in place I attached several bees, honeycombs, and butterflies to the ceiling as well to give it a nice festive look. Finally, I attached a red balloon around one of Pooh's arms and some fishing line to one of his ears. This I secured to the ceiling with a push pin, and Voila! A floating Pooh, soaring up to the top of the honey tree.
The last final touch to make this feel like you were truly entering the 100 Acre Wood was the scene setter back ground on the wall, and some leaves on the floor. Dan spent a good half hour gathering up fallen leaves that weren't too dirty to spread onto the floor. I think it gave the room a nice touch.
Of course what party would be complete without food? In keeping with the theme of Winnie the Pooh, I found these small honey pots that I used as soup bowls. Inside was a yummy cheddar and broccoli soup that did resemble honey. It was a lot of fun pretending we were eating honey out of a real honey pot.
To go along with our soup, we also enjoyed some sandwiches and of course, some Kerrits! LOL
To finish our festive meal off, we enjoyed some yummy Pooh cake.
Everyone enjoyed themselves, including our little dog who made the most adorable, chubby, little bee!!
Saturday, October 15, 2011
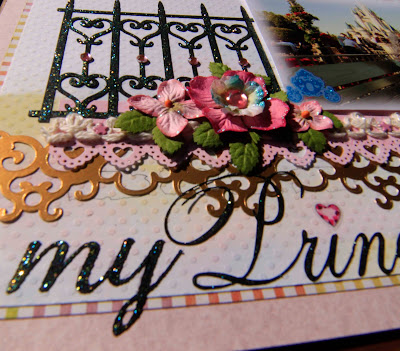
Someday...My Prince Will Come
...sing with me now! You know you want to! Well I finally finished a project I have been working on for about a month now. Yes, a month. It was one of those projects that you see in your mind's eye, but you can't quite make it happen the way you envision. So, I did a little here and a little there as I had time, and played with it until it turned out the way I had originally planned. I think it turned out pretty good!
This is my dear daughter all dressed up like a princess...sitting in front of the castle at WDW. She was sitting there all by herself when the song "Someday my prince will come" popped into my head. So, I had to get the camera out and start snapping shots. I think the idea of this layout was conceived on this day! LOL It only took me close to a year to get to getting around to. Here are some close-ups:
I had a lot of fun playing with different techniques with this one. I did some stenciling, color blending, punching as well as using my Silhouette for the title. I also used a generous helping of stickles for the title and gate. But honestly, glitter and princesses just go hand-in-hand. LOL
This is my dear daughter all dressed up like a princess...sitting in front of the castle at WDW. She was sitting there all by herself when the song "Someday my prince will come" popped into my head. So, I had to get the camera out and start snapping shots. I think the idea of this layout was conceived on this day! LOL It only took me close to a year to get to getting around to. Here are some close-ups:
I had a lot of fun playing with different techniques with this one. I did some stenciling, color blending, punching as well as using my Silhouette for the title. I also used a generous helping of stickles for the title and gate. But honestly, glitter and princesses just go hand-in-hand. LOL
Subscribe to:
Posts (Atom)